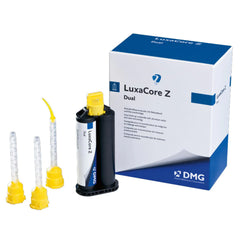
DMG Luxacore Z - Premium Composite for Core Build-up and Root Post Cementation
SmartMix Syringe - 2 x 9g with tips
Luxacore - Premium composite for core build-up and root post cementation
Cuttability like Dentin
LuxaCore Z is DMG’s premium composite for core build-ups and post cementation. LuxaCore Z provides dentine-like cuttability, which ensures controlled substance removal and a precise preparation margin. LuxaCore Z gives you optimal guidance control of the bur.
At the transitions between dentine and LuxaCore Z you will not notice any difference. This tactile stability permits groove-free preparations without any undercuts, presenting ideal conditions for the dental technician to perform precise work.
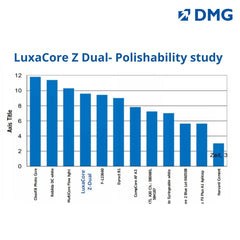
It is a Critical property in resin core materials:-
- A dentin-like cutting rate and feel is highly desirable
- “Substance Removal” tests determine a material’s cutting rate
- LuxaCore Z Dual has a cutting rate virtually identical to natural dentin
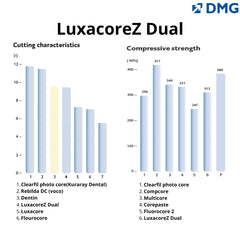
Increased compression strength and polishing values thanks to DMG’s patented nanotechnology
Benefits of Nano Particles
Zirconium Oxide as a filler
- Vastly improved compressive strength of 380 MPa
- Flexural modulus close to that of natural tooth structure allows LuxaCore Z Dual and tooth structure to react nearly identically to load forces
- Result: fewer micro-cracks
- Zirconia is a ceramic material and has Nonmetallic-biocompatibility with no danger of adverse reactions. It is 1,000 times stronger than steel but much lighter in weight.
Superior values
- LuxaCore Z-Dual is closer to natural dentine than any other product in market in terms of cutability.
- The proportion of zirconia gives excellent compressive strength.
- This ensures top-quality, natural restorations – and this has been confirmed in figures.
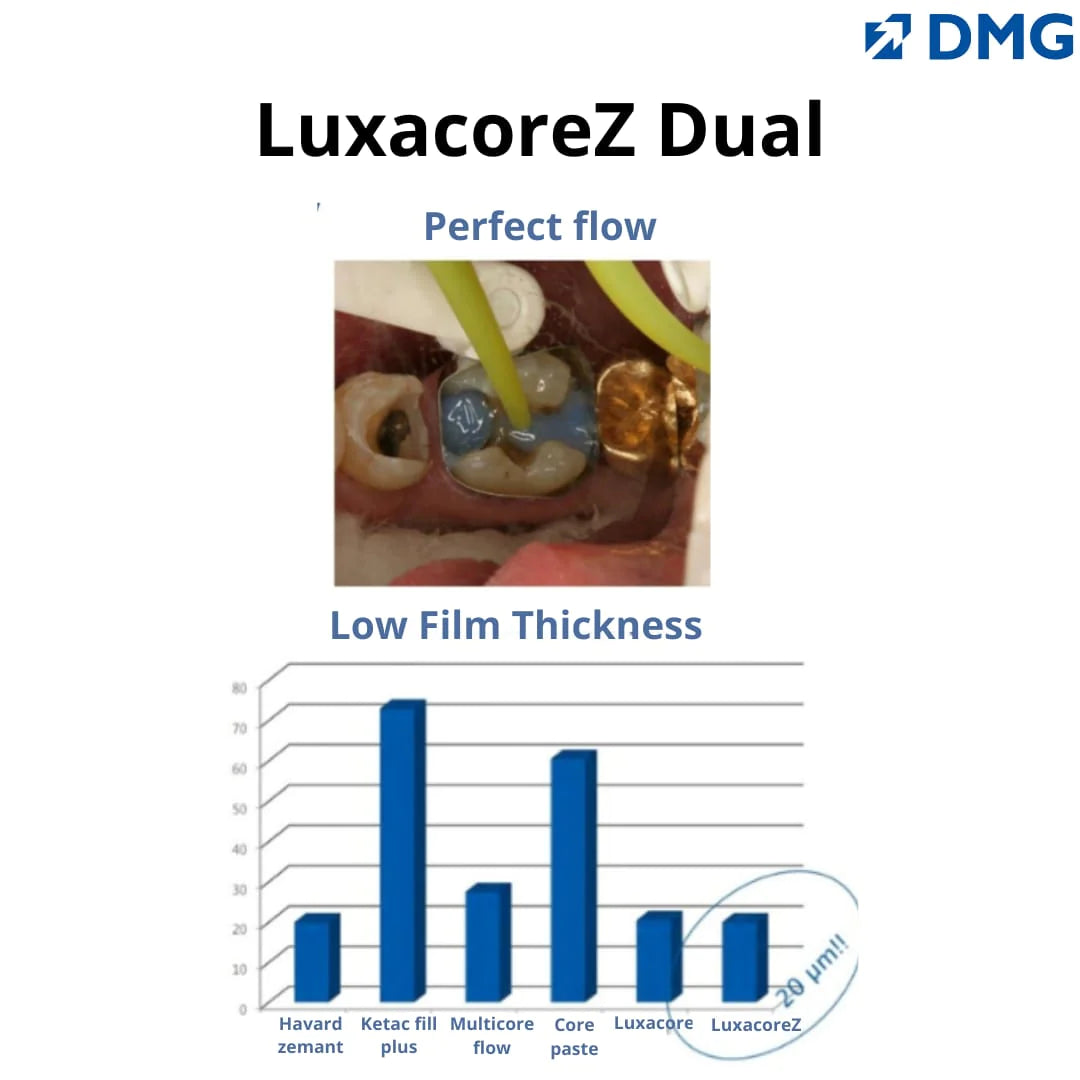
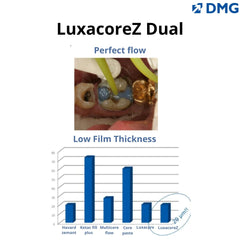
Perfect flow
- Excellent flow properties
- The material‘s outstanding flow properties guarantee optimum adaptation to the shape of cavity walls and posts.
Low film thickness
- When used as a post cement, the thin film thickness of just 20 μm is beneficial (the limit for precision cement according to ISO 4049 is 25 μm).
Monoblock
Monoblock = Stability.
- More haste less speed. Just a single material for core build-up and post cementation – that simplifies the work and creates reliable restorations.
- LuxaCore Z can be used with any pre-silanized post.
- Using just a small number of matched materials gives a very stable Monoblock. Stresses can be avoided in the sensitive system comprising tooth, post, cement, and core build-up material.
Fewer materials = a more reliable solution
- Good physical properties: light transmission, flexural strength, elasticity modulus
- Stress reduction
- Reduced risk of root fractures
- Minimized tension peaks
- Anatomical form for substance saving treatments
- Protection against bacterial leakage (coronal and apical)
- Long lasting and beautiful restoration
- High esthetics
- Cost saving
The result: excellent fit, a long-lasting restoration and the best possible care for your patient.The right partners allow quality care to be provided perfectly.
2. Cementation of root posts
Carry out core build-up
1. Isolate the tooth prior to preparation using a rubber dam.
2. Remove existing fillings and caries.
3. If the bonding agent used requires an additional etching step then etch using the etching gel as per the manufacturer’s instructions.
Please note: DMG recommends the use of the dual-cure adhesive system LuxaBond-Total Etch. In this case it is essential to etch the affected enamel and dentine surfaces. Observe the manufacturer’s instructions.
4. Apply bonding agent in accordance with the manufacturer’s instructions.
5. In order to simplify the application of LuxaCore Z-Dual, place a matrix around the prepared tooth and apply LuxaCore Z-Dual directly into the cavity. If a pre-fabricated core build-up form is used, apply LuxaCore Z-Dual directly into the core build-up form and place on the prepared tooth
Please note: LuxaCore Z-Dual can be formed within the working time of 1:30 minutes using a standard composite instrument, e.g. a Heidemann spatula. In order to enhance processing, coat the Heidemann spatula with a bond as a separating medium.
6. Leave LuxaCore Z-Dual to bond intraorally for approx. 5 minutes or expose to a suitable light curing unit for a minimum 40 second (maximum layer thickness ≤ 4 mm). In the case of thinner layers (≤ 2 mm) exposure to light for 20 seconds is sufficient
Please note: With chemical curing, low temperatures (e.g. when working in the area of the front teeth) lead to longer bonding times.
7. If used, remove a matrix only once the material has hardened fully.
8. Produce the preparation for the desired restoration form using standard preparation instruments.
9. If a plastic temporary restoration is to be applied to the prepared tooth, isolate the preparation using a suitable separation medium (e.g. Vaseline).
Cementation of root posts
1. Prepare root post in accordance with manufacturer’s instructions.
2. Prepare the root canal in accordance with the requirements of the respective root post.
3. If the bonding agent used requires an additional etching step then etch inside the canal using the etching gel per the manufacturer’s instructions
Please note: It is advisable to use the dual-cure adhesive system LuxaBond-Total Etch. In this case it is essential to etch the affected enamel and dentine surfaces. Observe the manufacturer’s instructions.
4. Apply bonding agent in accordance with the manufacturer’s instructions. If an adhesive system with a light-curing component is used, use a paper tip to remove any excess from the canal prior to the application of light. Otherwise the lumen may be blocked.
5. Apply LuxaCore Z-Dual to the canal lumen. When doing so keep the end of the tip constantly immersed in the material. If desired, it is additionally possible to coat the root post with LuxaCore Z-Dual. The LuxaCore Z-Dual working time is 1:30 minutes.
Please note: When using LuxaBond-Total Etch, the working time of LuxaCore Z-Dual in the root canal is reduced to approx. 30 seconds due to the contact with the pre-bond. It is also possible that the working time may be reduced with other bonding agents. Observe the manufacturer’s instructions.
6. Set the root post.
7. Using a suitable lamp, apply light to the mate- rial for 20 seconds.
8. Leave the material to harden for approx. 5:00 minutes. This guarantees complete curing, also in the areas that cannot be reached by light.
Please note: With LuxaCore Z-Dual it is possible to work on the coronal portion of the tooth as a core build-up. Due to the easy flowing consistency, it is recommended that work be carried out using a matrix
Using the Automix cartridge
Insert cartridge
1. Push up the lever [A] at the back of the Automix-Dispenser and pull back the slide completely.
2. Lift up the plastic lever, insert the cartridge and lock it by pushing down the plastic lever.
Please note: Make sure that the notches on the cartridge line up with those on the Automix-Dispenser
Attaching a mixing tip
1. Remove the cartridge cap or used mixing tip by turning it 90° counterclockwise, and discard it.
2. Attach a new mixing tip.
Please note: In order to achieve an optimum mixing result, DMG recommends the use of mixing tips available from DMG. All mixing tips are also available as refill packs.
Please note: Make sure that the notches on the mixing tip line up with those on the cartridge.
3. Turn the mixing tip clockwise 90° to lock it.
4. Attach an Intraoral tip [F] or Endo tip.
Applying the material
▸ When using a cartridge for the first time, espress a pea sized amount of material and discard it.
▸ The material is mixed in the mixing tip by pulling the trigger of the Automix-Dispenser and it is then applied directly
Please note: After the application, leave the used mixing tip on the cartridge to cap unused material
Remove cartridge
1. Push up the lever at the back of the Automix-Dispenser and pull back the slide completely.
2. Lift up the plastic lever [C] and remove the cartridge
Using the Smartmix Syringe
1.Before attaching the mixing tip, remove the cap or used mixing tip after twisting it 90° counterclockwise, and discard it
2.Attach a new mixing tip.
Please note: In order to achieve an optimum mixing result, DMG recommends the use of mix- ing tips available from DMG. All mixing tips are also available as refill packs.
Please note: Make sure that the notches on the mixing tip line up with those on the Smartmix syringe
3.Turn the mixing tip clockwise 90° to lock it into place.
4.Attach an Intraoral tip or Endo tip.
5.The material is mixed in the mixing tip when it is expressed and it can be applied directly
Please note: When using an syringe for the first time, express a pea-sized amount of material and discard it
6.Leave the used mixing tip on the Smartmix syringe after use. It serves as a cap
Disinfection of the Automix-Dispenser
The Automix-Dispenser is autoclavable
Storage:
• Store in a dry place at 2 - 25 °C/36 - 77 °F
• If possible, store unopened material in a refrigerator.
• Do not use after the expiration date
Key Features
1. Cuts like dentine
2. Extremely high compressive strength
3. Excellent flow properties
4. Reliable curing
5. One material for core build up and cementing post